
搭建Gitea仓库
下载
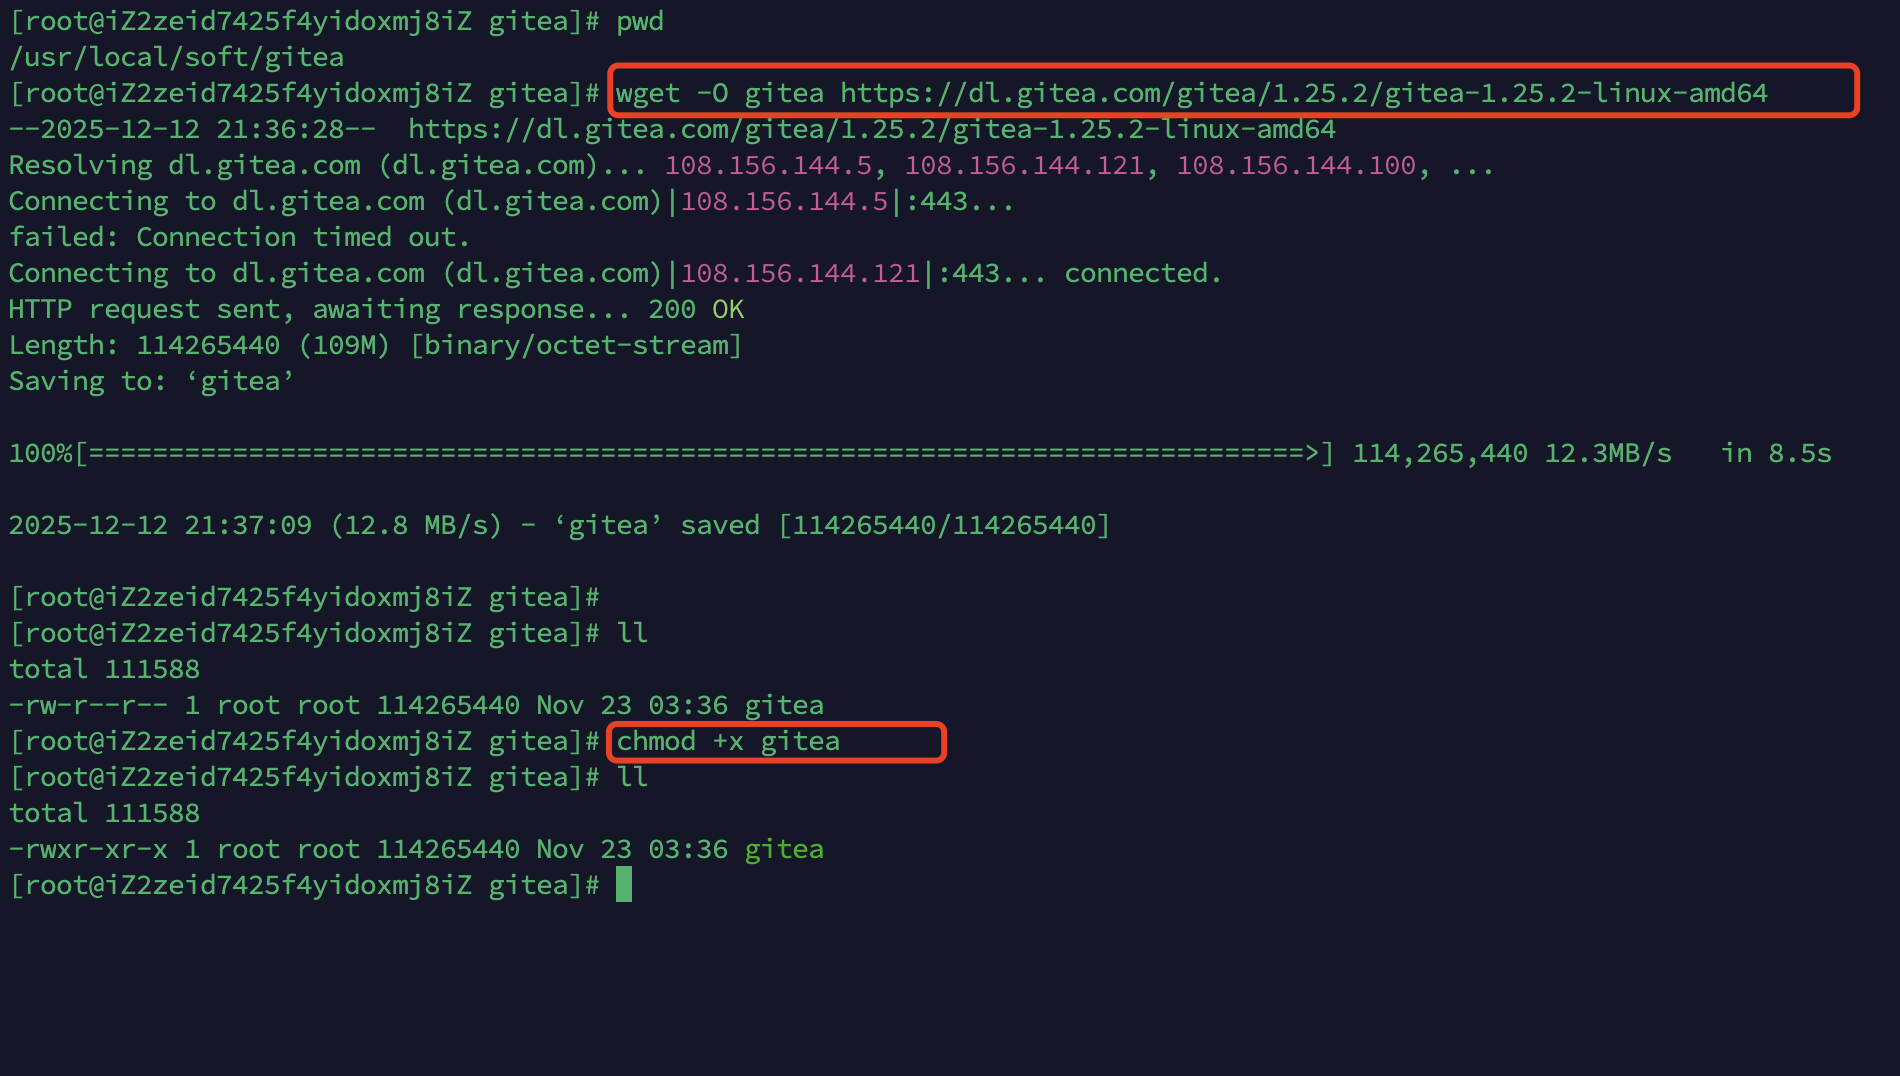
下载二进制包
wget -O gitea https://dl.gitea.com/gitea/1.25.2/gitea-1.25.2-linux-amd64
对文件进行授权
chmod +x gitea
cp gitea /usr/local/bin/gitea
准备环境
检查服务器上是否安装了Git。如果不是,先安装。Gitea 需要 Git 版本 >= 2.0。
git --version
创建用户来运行gitea
groupadd --system git
adduser \
   --system \
   --shell /bin/bash \
   --comment 'Git Version Control' \
   --gid git \
   --home-dir /home/git \
   --create-home \
   git
创建所需的目录结构
mkdir -p /var/lib/gitea/{custom,data,log}
chown -R git:git /var/lib/gitea/
chmod -R 750 /var/lib/gitea/
mkdir /etc/gitea
chown root:git /etc/gitea
chmod 770 /etc/gitea
/etc/gitea临时设置了用户写入权限,以便网页安装程序能够写入配置文件。安装完成后,建议将权限设置为只读,使用以下方法:git
chmod 750 /etc/gitea
chmod 640 /etc/gitea/app.ini
启动Gitea
1. 创建服务文件以自动启动 Gitea
vim /etc/systemd/system/gitea.service
[Unit]
Description=Gitea (Git with a cup of tea)
After=network.target
###
# Don't forget to add the database service dependencies
###
#
#Wants=mysql.service
#After=mysql.service
#
#Wants=mariadb.service
#After=mariadb.service
#
#Wants=postgresql.service
#After=postgresql.service
#
#Wants=memcached.service
#After=memcached.service
#
#Wants=redis.service
#After=redis.service
#
###
# If using socket activation for main http/s
###
#
#After=gitea.main.socket
#Requires=gitea.main.socket
#
###
# (You can also provide gitea an http fallback and/or ssh socket too)
#
# An example of /etc/systemd/system/gitea.main.socket
###
##
## [Unit]
## Description=Gitea Web Socket
## PartOf=gitea.service
##
## [Socket]
## Service=gitea.service
## ListenStream=<some_port>
## NoDelay=true
##
## [Install]
## WantedBy=sockets.target
##
###

[Service]
# Uncomment the next line if you have repos with lots of files and get a HTTP 500 error because of that
# LimitNOFILE=524288:524288
RestartSec=2s
Type=simple
User=git
Group=git
WorkingDirectory=/var/lib/gitea/
# If using Unix socket: tells systemd to create the /run/gitea folder, which will contain the gitea.sock file
# (manually creating /run/gitea doesn't work, because it would not persist across reboots)
#RuntimeDirectory=gitea
ExecStart=/usr/local/bin/gitea web --config /etc/gitea/app.ini
Restart=always
Environment=USER=git HOME=/home/git GITEA_WORK_DIR=/var/lib/gitea
# If you install Git to directory prefix other than default PATH (which happens
# for example if you install other versions of Git side-to-side with
# distribution version), uncomment below line and add that prefix to PATH
# Don't forget to place git-lfs binary on the PATH below if you want to enable
# Git LFS support
#Environment=PATH=/path/to/git/bin:/bin:/sbin:/usr/bin:/usr/sbin
# If you want to bind Gitea to a port below 1024, uncomment
# the two values below, or use socket activation to pass Gitea its ports as above
###
#CapabilityBoundingSet=CAP_NET_BIND_SERVICE
#AmbientCapabilities=CAP_NET_BIND_SERVICE
###
# In some cases, when using CapabilityBoundingSet and AmbientCapabilities option, you may want to
# set the following value to false to allow capabilities to be applied on gitea process. The following
# value if set to true sandboxes gitea service and prevent any processes from running with privileges
# in the host user namespace.
###
#PrivateUsers=false
###

[Install]
WantedBy=multi-user.target
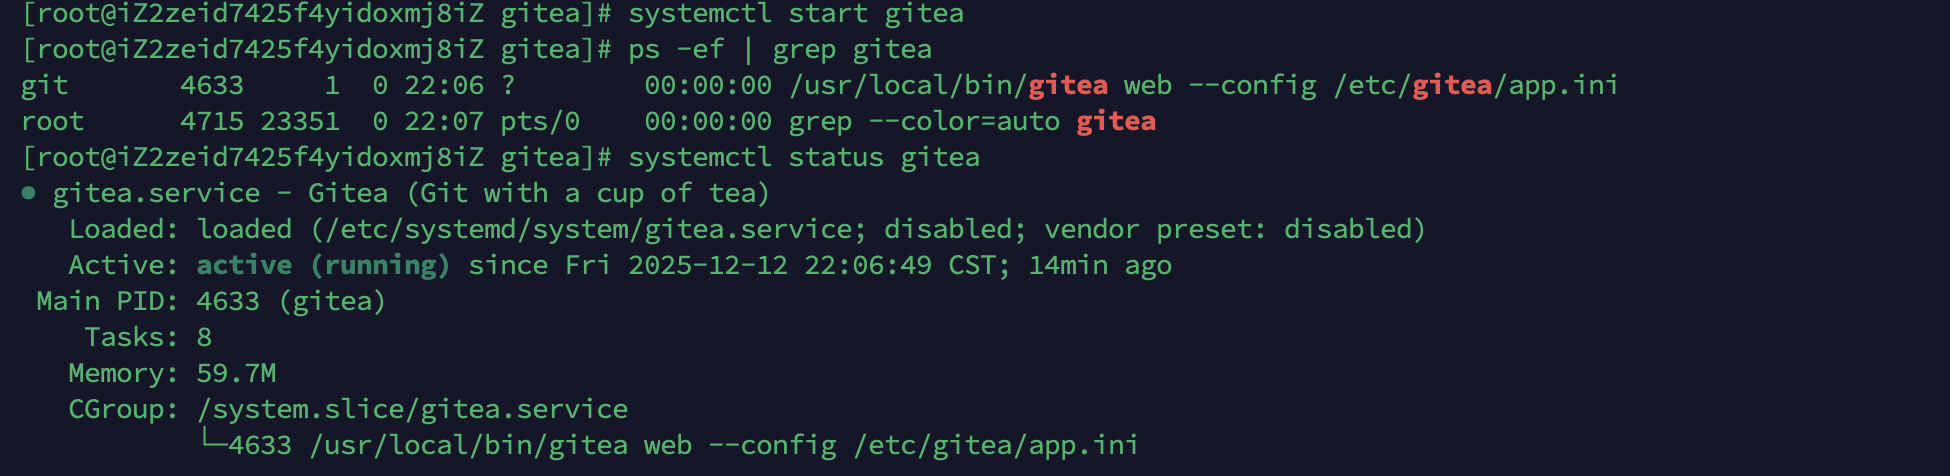
开机时启用并启动Gitea
sudo systemctl enable gitea
sudo systemctl start gitea
2. 从命令行/终端运行
GITEA_WORK_DIR=/var/lib/gitea/ /usr/local/bin/gitea web -c /etc/gitea/app.ini
初始化报错:数据库设置无效: migrate: git not found: exec: "/usr/bin/git": stat /usr/bin/git: no such file or directory
# 创建从系统路径指向新 git 的符号链接
sudo ln -s /usr/local/bin/git /usr/bin/git

# 验证链接
ls -l /usr/bin/git
# 应该显示:/usr/bin/git -> /usr/local/bin/git

# 测试是否生效
sudo -u git /usr/bin/git --version  # 使用 Gitea 的运行用户测试
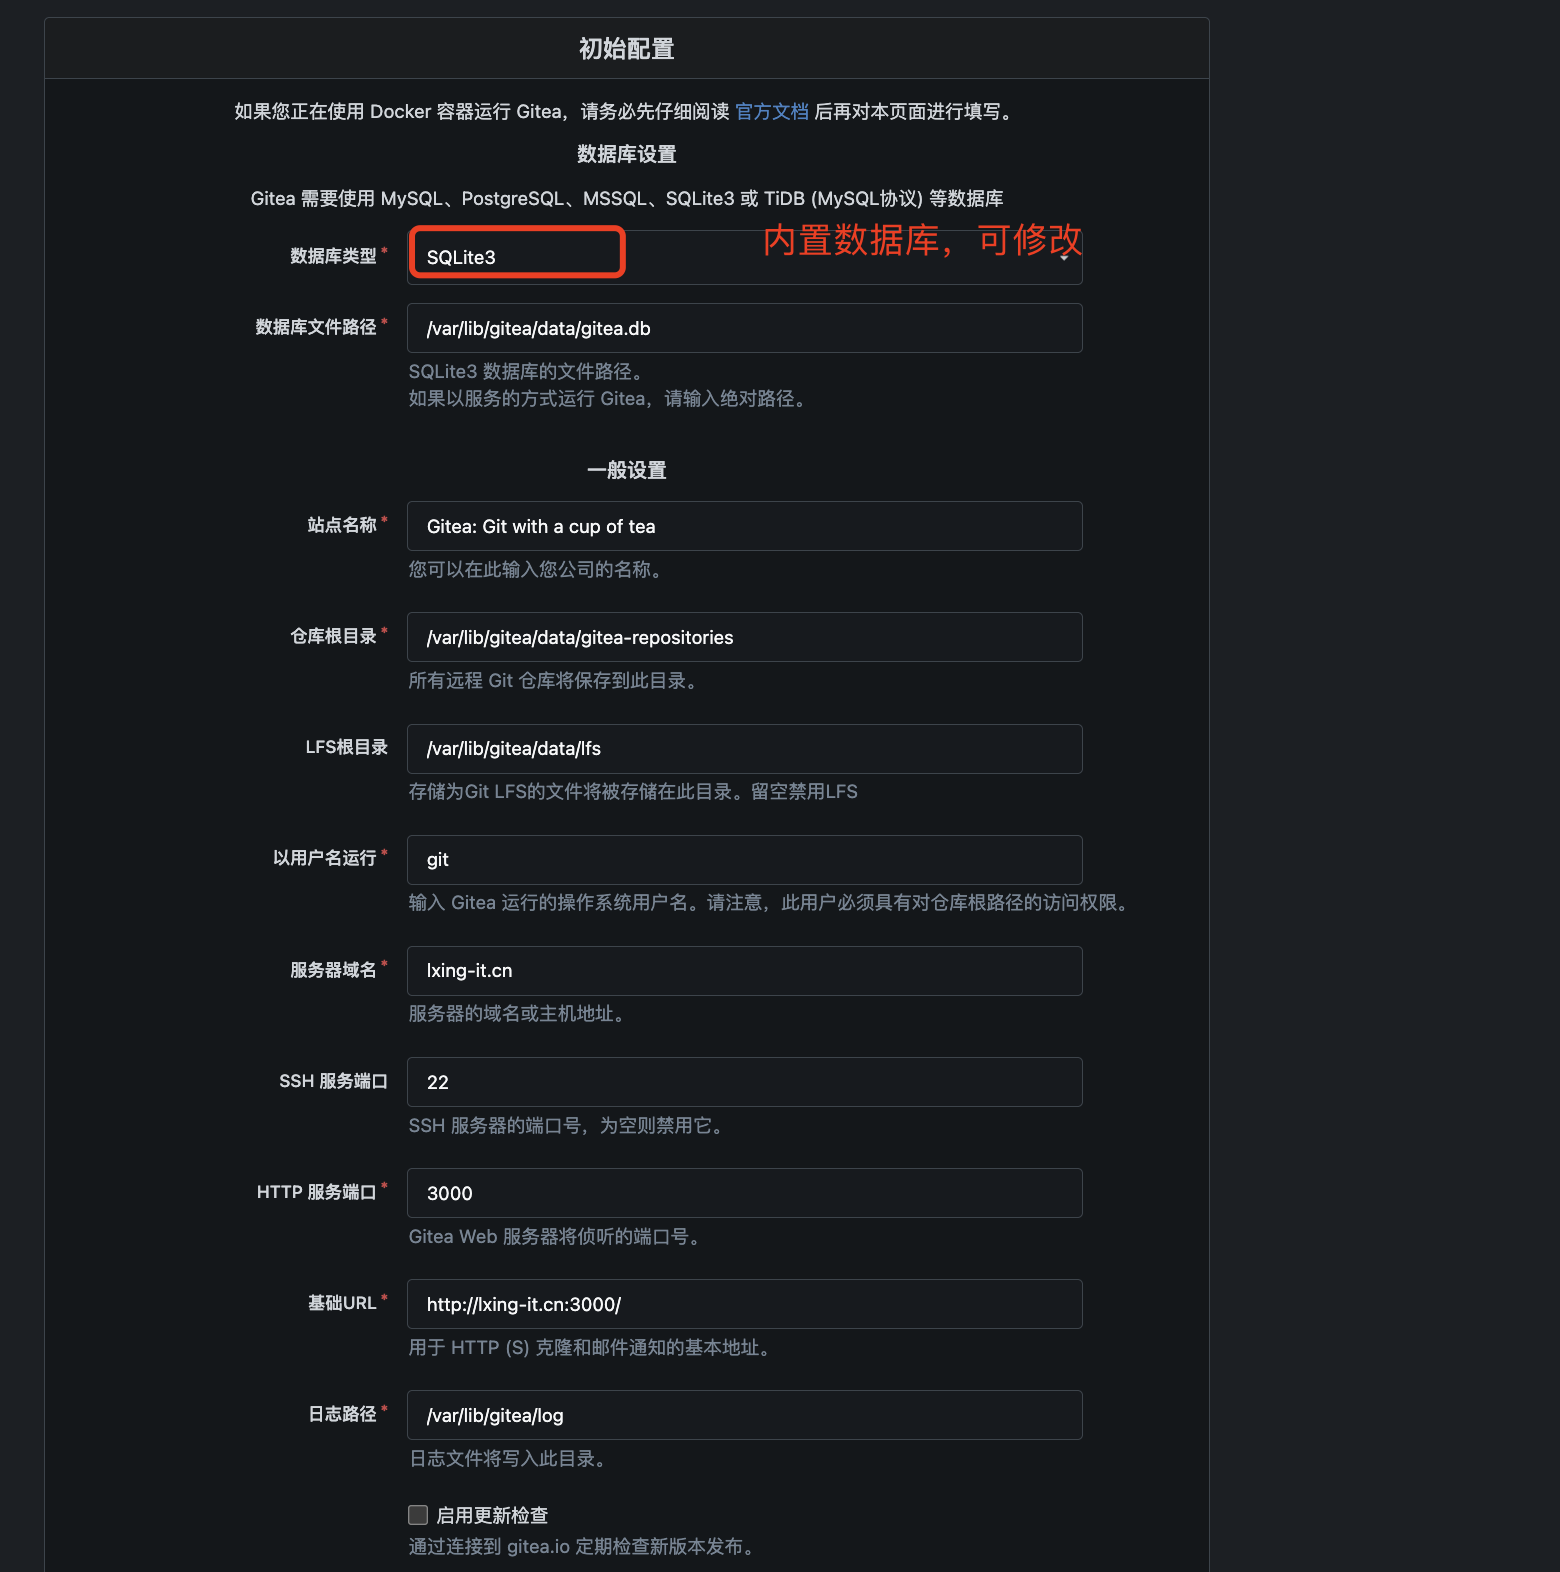
gitea配置
/etc/gitea/app.ini
[server]
# SSH 访问的域名
SSH_DOMAIN = xxx.xxxx.cn
# HTTP 访问的域名
DOMAIN = xxx.xxxx.cn
# HTTP 监听端口
HTTP_PORT = 3000
# 完整的访问URL
ROOT_URL = http://xxx.xxxx.cn/
# 应用数据路径
APP_DATA_PATH = /var/lib/gitea/data

[service]
# 不需要邮箱确认
REGISTER_EMAIL_CONFIRM = false
# 禁用邮件通知
ENABLE_NOTIFY_MAIL = false
# 禁止公开注册
DISABLE_REGISTRATION = true
# 禁止外部注册
ALLOW_ONLY_EXTERNAL_REGISTRATION = false
# 不需要验证码
ENABLE_CAPTCHA = false
# 必须登录查看
REQUIRE_SIGNIN_VIEW = true
DEFAULT_KEEP_EMAIL_PRIVATE = false
DEFAULT_ALLOW_CREATE_ORGANIZATION = true
DEFAULT_ENABLE_TIMETRACKING = true
NO_REPLY_ADDRESS = noreply.localhost

[openid]
# 禁用openid登录
ENABLE_OPENID_SIGNIN = false
# 禁用openid注册
ENABLE_OPENID_SIGNUP = false
sudo tee /etc/gitea/app.ini << 'EOF'
APP_NAME = Gitea
RUN_USER = git
RUN_MODE = prod

[server]
HTTP_ADDR = 0.0.0.0
HTTP_PORT = 3000

# ========== 子路径配置关键 ==========
# 域名(不带路径)
DOMAIN = xxxx.xx.com.cn

# 根URL(必须包含子路径!)
ROOT_URL = http://xxxx.xx.com.cn/gitea/

# 本地访问URL
LOCAL_ROOT_URL = http://127.0.0.1:3000/

# 协议
PROTOCOL = http

# 子URL重定向(重要!启用子路径支持)
REDIRECT_OTHER_PORT = false
OFFLINE_MODE = false
ENABLE_GZIP = true

# ========== 信任代理 ==========
# 域名服务器的内网IP
TRUSTED_PROXIES = 127.0.0.1/8 ::1/128 10.2.33.4

# ========== 应用设置 ==========
[service]
DISABLE_REGISTRATION = false
REQUIRE_SIGNIN_VIEW = false

# ========== 服务器设置 ==========
[server]
APP_DATA_PATH = /app/gitea
LFS_START_SERVER = true
LFS_CONTENT_PATH = /app/gitea/lfs

# ========== 数据库 ==========
[database]
DB_TYPE = sqlite3
PATH = /app/gitea/gitea.db

# ========== 仓库 ==========
[repository]
ROOT = /app/gitea/repositories

# ========== 会话 ==========
[session]
PROVIDER = file
PROVIDER_CONFIG = /app/gitea/sessions

# ========== 日志 ==========
[log]
ROOT_PATH = /app/gitea/log
MODE = console
LEVEL = Info

# ========== 缓存 ==========
[cache]
ADAPTER = memory
INTERVAL = 60

# ========== 队列 ==========
[queue]
TYPE = channel
DATADIR = /app/gitea/queues

# ========== 图片 ==========
[picture]
DISABLE_GRAVATAR = false
ENABLE_FEDERATED_AVATAR = true

# ========== 附件 ==========
[attachment]
ENABLED = true
PATH = /app/gitea/attachments
MAX_SIZE = 100
MAX_FILES = 10
EOF

sudo chown -R git:git /etc/gitea
sudo systemctl restart gitea
恢复密码
方法1:使用 Gitea 命令行工具
# 1. 使用 gitea 命令重置密码
sudo -u gitea /usr/local/bin/gitea admin user change-password \
  --username admin \
  --password "NewPassword123"

# 如果不知道用户名,先查看用户列表
sudo -u gitea /usr/local/bin/gitea admin user list
方法2:通过 SQLite 数据库直接修改
# 1. 备份数据库
sudo cp /var/lib/gitea/data/gitea.db /var/lib/gitea/data/gitea.db.backup

# 2. 生成新密码的哈希值
sudo -u gitea /usr/local/bin/gitea admin generate-password-hash --password "NewPassword123"
# 输出类似:pbkdf2:sha256:60000$xxxxxxxx$xxxxxxxxxxxxxxxxxxxxxxxxxxxxxxxxxxxxxxxx

# 3. 更新数据库
sqlite3 /var/lib/gitea/data/gitea.db << EOF
UPDATE user SET passwd_hash = '生成的哈希值' WHERE name = 'admin';
UPDATE user SET salt = '' WHERE name = 'admin';
EOF

# 4. 重启 Gitea
sudo systemctl restart gitea
-- 查看现有用户
SELECT id, name, is_admin FROM user;

-- 方法A:重置现有管理员密码(需要生成哈希)
-- UPDATE user SET passwd_hash='哈希值' WHERE name='admin';

-- 方法B:创建新管理员账户(更简单)
INSERT OR IGNORE INTO user (
  type, name, email, passwd_hash,
  salt, is_active, is_admin,
  avatar, avatar_email,
  created_unix, updated_unix
) VALUES (
  0, 'recoveryadmin', 'recovery@xxxx-it.cn',
  'pbkdf2:sha256:60000$xxxxxxxx$xxxxxxxxxxxxxxxxxxxxxxxxxxxxxxxxxxxxxxxx',
  '', 1, 1,
  '', 'recovery@xxxx-it.cn',
  strftime('%s', 'now'), strftime('%s', 'now')
);
方法3:创建新的管理员账户
# 1. 创建新管理员
sudo -u gitea /usr/local/bin/gitea admin user create \
  --username newadmin \
  --password "NewAdminPass123" \
  --email "newadmin@xxxx-it.cn" \
  --admin

# 2. 用新账户登录,然后重置旧账户密码
方法4:修改配置文件临时开放注册
# 1. 修改配置
sudo vim /etc/gitea/app.ini
[service]
DISABLE_REGISTRATION = false     # 临时允许注册
REQUIRE_SIGNIN_VIEW = false      # 临时允许未登录查看
# 2. 重启 Gitea
sudo systemctl restart gitea

# 3. 注册新账户(会成为普通用户)
# 4. 通过数据库提升权限
# 5. 改回配置