
什么是logrotate
logrotate 程序是一个日志文件管理工具。用于分割日志文件,删除旧的日志文件,并创建新的日志文件,起到“转储”作用。可以节省磁盘空间。
logrotate文件位置
该配置文件位于 /etc/logrotate.conf , /etc/logrotate.d/
配置logrotate
cd /etc/logrotate.d/
vim tomcat
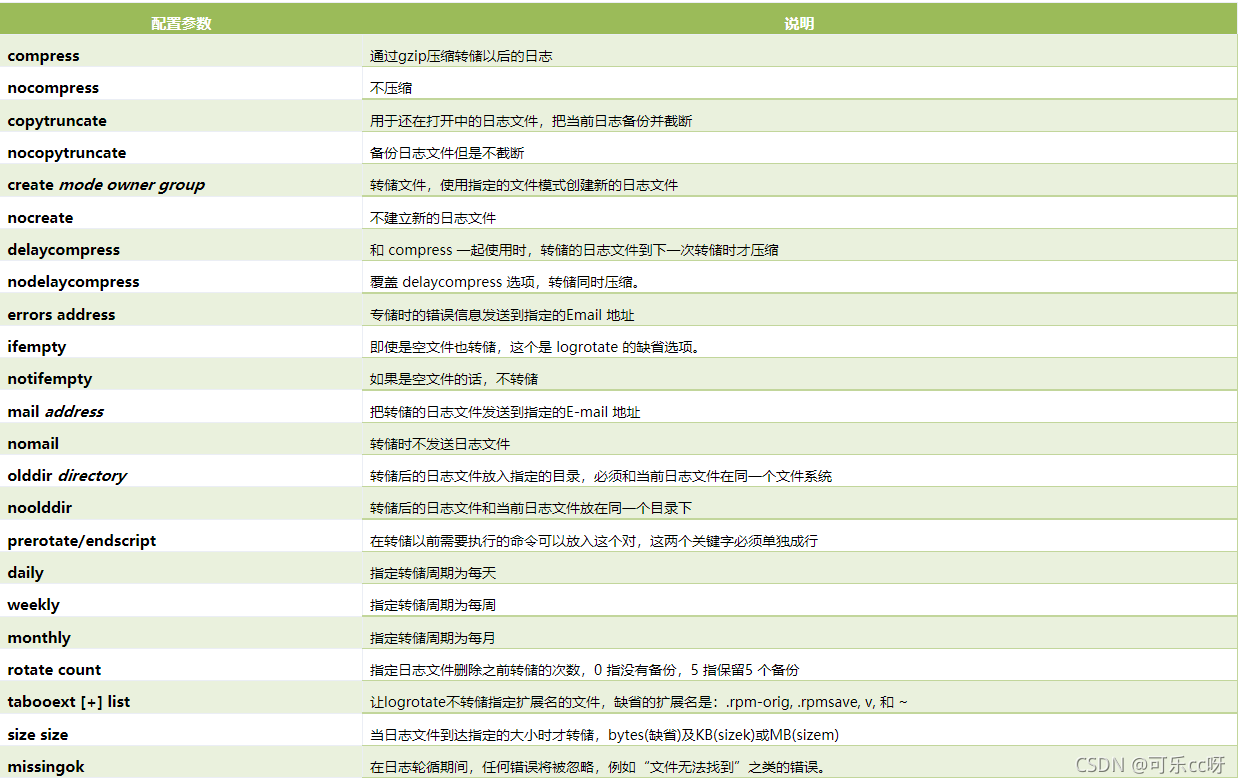
/usr/local/apache-tomcat-8.5.85/logs/catalina.out {
#指定转出周期为每天
daily
#指定文件删除前的转储次数,0为每月备份,10为保留10个备份 例如:每天备份一个,备份到10个,第11天删除第一个备份文件
rotate 10
#如果日志不存在则忽略该警告信息
missingok
#文件后缀是日期格式
dateext
#启用gzip压缩
compress
#忽略空文件
notifempty
#把当前文件备份并截短
copytruncate
}
logrotate [OPTION...] <configfile>
-d, --debug :debug模式,测试配置文件是否有错误。
-f, --force :强制转储文件。
-m, --mail=command :压缩日志后,发送日志到指定邮箱。
-s, --state=statefile :使用指定的状态文件。
-v, --verbose :显示转储过程。
logrotate生效时间
要想知道logrotate什么时候执行日志分割操作,需要关注/etc/anacrontab及/var/lib/logrotate/logrotate.status这两个文件。
而/etc/anacrontab是使logrotate按时执行脚本的主要配置文件
sudo cat /etc/anacrontab
# /etc/anacrontab: configuration file for anacron

# See anacron(8) and anacrontab(5) for details.

SHELL=/bin/sh
PATH=/sbin:/bin:/usr/sbin:/usr/bin
MAILTO=root
# the maximal random delay added to the base delay of the jobs
RANDOM_DELAY=45
# the jobs will be started during the following hours only
START_HOURS_RANGE=03-22

#period in days   delay in minutes   job-identifier   command
1       5       cron.daily              nice run-parts /etc/cron.daily
7       25      cron.weekly             nice run-parts /etc/cron.weekly
@monthly 45     cron.monthly            nice run-parts /etc/cron.monthly
从上面的内容可以看出:如果机器没有关机,默认的logrotate(配置文件里设置的是cron.daily)一般会在每天的3点05分到3点50分之间执行,真实的延迟时间是 RANDOM_DELAY + delay in minutes.
如果在3-22这个时间段内服务器处于关机状态,则logrotate会在机器开机5分钟后执行分割日志的操作。
注意
不建议直接修改此文件,如果想修改logrotate默认的执行时间,可通过crontab执行自定义的logrotate配置文件,但这时就不能将自定义的配置文件放置在 /etc/logrotat.d/下了,应该放置在/etc/logrotat.d/下层目录或者另外的路径,否则就会执行两遍日志分割的操作,执行时间分别是你在crontab中定义的时间以及anacrontab默认的执行时间即3:05-3:50。
自定义logrotate执行时间
正常的日志分割都是按天进行的,即每个日志只记录0-24点之间的内容,如果是按默认的crontab设定的执行时间那肯定是不行的,具体实现其实有两种方法:
方法1(推荐):
1: 在/etc/logrotate.d创建下层目录,mkdir -p /etc/logrotate.d/nginx ,当然也可在非/etc/logrotate.d/下创建此目录,例如我是在/etc/logrotate.daily.0下创建了nginxLogrotate文件.
2: 移除之前自定义的配置文件,sudo mv /etc/logrotate.d/nginxLogrotate ~/bak/,这样做的作用就是防止执行两次日志分割脚本的操作.
3: 添加crontab计划任务, sudo echo "59 23 * * * /usr/sbin/logrotate -f /etc/logrotate.daily.0/nginxLogrotate >/dev/null 2>&1" > /etc/crontab
当然也可直接在root用户下执行crontab -e然后添加上面的内容.
如果用非root用户则会报错error: error creating output file /var/lib/logrotate/logrotate.status.tmp: 权限不够
4: 重启crontab,service crond restart,其实可以不用重启.
方法2(没验证):
需谨慎,会替换系统默认执行logrotate的时间。
设置00:00执行:
1: /etc/anacrontab 配置文件,将 RANDOM_DELAY=0 , START_HOURS_RANGE=0-22 , delay in minutes 改为0。
2: etc/cron.d/0hourly 配置文件,将01改为00(/etc/cron.daily那一行)。
3: /etc/logrotate.d/nginx/nginxLogrotate里添加上dateyesterday
这样logrotate就可以在每天00点00分转储日志(配置文件里设置的是daily)
设置23:59执行:
1: 调整/etc/anacrontab配置文件,将RANDOM_DELAY=0, START_HOURS_RANGE=23-24 , delay in minutes 改为0。
2: 调整 /etc/cron.d/0hourly 配置文件,将01改为59(/etc/cron.daily那一行),即每小时的59分执行,但因为logrotate每天只执行一次所以具体执行时间是23:59。
测试配置是否正确
logrotate -d /etc/logrotate.d/tomcat
手动执行日志切割
logrotate -f /etc/logrotate.d/tomcat
配置linux自带系统定时器
crontab -e
# 脚本写到定时计划中去(每天23点59分运⾏)
59 23  * * * /usr/sbin/logrotate -f /etc/logrotate.d/tomcat
# 可查看已开启的定时任务
crontab -l
# 重新载入定时配置,启动定时器,查看定时状态
# 重启载⼊配置
systemctl reload crond
# 如未启动,则需要启动crontab
systemctl start crond
systemctl status crond
常见问题:
1、如果corntab执行的时间和预期不一致,则更改Linux系统时区并重启crontab 或使用tzselect方式更改时区
cp /usr/share/zoneinfo/Asia/Shanghai /etc/localtime
service crond restart
# 获取系统可用时区
timedatectl list-timezones
2、禁用默认的logrotate任务。
2.1、打开 /etc/cron.daily/logrotate 文件,查找并注释掉下面两行命令:
#/usr/sbin/logrotate /etc/logrotate.conf >/dev/null 2>&1
#EXITVALUE=$?
2.2、保存并关闭文件。
请注意,这只会禁用系统默认的logrotate任务,而不会影响其他可能已经存在的自定义logrotate配置。如果您希望删除某个自定义配置文件,请将其从/etc/logrotate.d目录中删除。
3、在 crontab 中指定时区
#每天 10 点执行命令,并指定时区为 Asia/Shanghai
0 10 * * * TZ='Asia/Shanghai' /path/to/command
4、获取crontab下次执行时间
首先,需要在终端上安装 croniter 工具。如果已经安装了 Python 包管理器 pip,可以使用以下命令安装:
pip install croniter
使用以下命令来计算下一个任务的执行时间:将 YOUR_CRONTAB_EXPRESSION 替换为您想要验证的实际 crontab 表达式
python -c "from croniter import croniter; from datetime import datetime; iter = croniter('YOUR_CRONTAB_EXPRESSION', datetime.now()); print(iter.get_next(datetime))"
借鉴文档:
https://www.echoxu.cn/logrotate/